Note: The examples that are used in this tutorial will be opened in a
new window!
This is a tutorial about the basics of CSS (Cascading Style Sheets). It's
handy if you have some knowledge of HTML.
Introduction CSS is the most important mark-up language for webmasters. CSS is a mark-up
language for web pages and so it isn't a scripting language.
What's so important about CSS? And why should you bother to learn it?
There are several reasons to do it! Here some short ones:
"Time is money" - The first and most important reason!
You can link 1 style sheet to multiple documents, so that adjusting of
your HTML pages goes much quicker!
Flexibility - You can address and adjust every HTML tag separately.
User friendly - CSS is supported with every browser.
Loading time - The browser must read less coding so quicker loading
times.
Multiple lay-out possibilities - You can make more then one
lay-out.
The only reason why you shouldn't use CSS is because you don't know it yet!
Syntax Also CSS has specified syntax. These are the rules you need to follow by
writing CSS.
Every reference of CSS consists of at least 3 parts.
The selector
The property
A value
CSS syntax:
selector {property: value;}
Properties It's also perfectly possible to assign multiple properties to 1 selector.
Like a text in bold and in italics. We separate all the properties for this from
each other with ; .
CSS syntax:
body {property1: value; property2: value; property3: value;}
The selector This part indicates where the lay-out of the text or style block is located.
These location can be addressed on 3 different possible ways.
HTML-tag You can easily give a lay-out to a complete HTML-tag. In this way you
can assign for every body on your website in example a black
background-color.
In this way you don't have to adjust every body.
The selector is with this the name of the HTML-tag. The example of body is
found here.
CSS syntax:
<style type="text/css">
body {background-color: black;}
</style>
Class It's also possible to make your own group and give to that group 1
specified lay-out. With this you give a name to the HTML-tag. This do we call a class.
That name or class can you summon in your CSS and in that way give a lay-out
to it. But watch out you may not forget that you have to put a dot in
your CSS code before every class.
A simple example is that you make a class to put some specified text in bold.
ID The third possibility is to set a specified range for the lay-out of the
text. You can assign an ID to every HTML-tag. This is a personal name for this
tag to specifically address to this tag. In example when you give the H1
HTML-tag an ID and refer to this ID in your CSS code by placing "#"
before the name of the selector.
An example can be that you want to assign a specified lay-out to the main
title of your website.
Commentary It's also possible to write commentary between your CSS code that later on
can help you find back specified styles. This is especially important when you use
long and complex CSS codes. You may place this commentary between different
styles or between the different properties.
CSS syntax:
<style type="text/css">
selector1 {property: value;}
/* Here you can write your commentary */
selector2 {property: value;}
</style>
or
CSS syntax:
<style type="text/css">
selector {
property1: value;
/* Here you can write your commentary */
property2: value;
}
</style>
How do you put the CSS codes on your web page? There are two methods to put your CSS codes on you web page. The two ways are:
Internal CSS
Internal CSS means that you will find the CSS codes itself in the
document. This is handy if you want to lay-out a page quickly. The use of
internal CSS is only handy if you want to put the style on that page only.
If you want to put the same style everywhere in your website, then I would
recommend you to use external CSS (this is the other way to put CSS codes on
a web page and this will be explained later on). We can distinguish two
variants. These two variants are:
Inline CSS With this we assign directly the lay-out to the
content of a specified HTML-tag in the tag itself. The disadvantage is
that we lose so much of the benefits of CSS. Because by doing it this
way we do a step back to way how the lay-out in past has been assigned.
So this is handy for small adjustments or if this lay-out is just for 1
document.
In this tag we use style="". In this we write the necessary
properties and values. Attention, please! The syntax rules keep
in tact!
HTML syntax:
<p style="background-color: green; border-style: solid; border-width: 1px">
Lay-out of the text </p>
Style tag
We can also use the separate HTML-tag <style> which we put in the
<head> section. These contains all the styles we can use in the
document. The disadvantage of this is that we can only link 1 document
to this styles. With this we must give the type-attribute to the
style-tag as you can see in the example.
HTML syntax:
<head>
<style type="text/css">
body {background-color: blue;}
p {font-weight: bold;}
</style>
</head>
External CSS By the use of external CSS-files we optimally make use of the benefits
of CSS. Now we can link several pages to that one file. A CSS-file is also
called an "external style sheet". This file is a pure text file
that you write with Notepad. You must add the extension .css to the file, so
that it's clear that it's a CSS-file. The link to this file is put in the
<head> section of the HTML document.
The coding of a CSS file is almost the same as the coding with the
style-tag. The only difference between them is that you put the coding
instead of in the style-tag, you put it in a separate file. The coding in a
CSS file should look like this.
CSS file syntax:
body {background-color: blue;}
p {font-weight: bold;}
Attention, please!
You can use this different methods at the same time, but the method the
nearest by the lay-out of the tag has priority. The general rule is that Inline
CSS has priority to a Style tag and this on his turn has priority to the
External CSS file.
Beginner
Now that we've seen how we apply a CSS style to a document, can we explain
the further possibilities. These are especially the different properties. With
each property we give an example so that can get the hang of everything in a
practice kind of way.
Font types
To change the font type we have several properties, think of size, type,
color, ..... Below you find a list of the most important properties.
font-family
Font-family is the attribute to define the font type of your style.
It's not only possible to choose 1 font type, but also to make a list of
preferences. This means that you can give multiple font types in a defined
order. In the case that he can't find the first font type, he takes the next
one on the list.
CSS syntax:
.example {font-family: "Times New Roman", Times, serif;}
HTML syntax:
Times New Roman with alternatives.
font-style
Font-style is the attribute to define the style of your font-type (a
style like italic or oblique). Attention, please! Bold and underlined
text isn't part of this! For that we use another attribute.
CSS syntax:
.example {font-style: italic;}
HTML syntax:
Italic text
CSS syntax:
.example {font-style: oblique;}
HTML syntax:
Oblique text
font-size
Font-size is the attribute to define the size of your font-type. This is
very useful to for example to indicate and attract attention on titles. The
value of this attribute can be defined with several types (percentage facing
the standard font type, point size or a standard value like small). All
values can you find back in the Property List. Here we illustrate 2
examples.
CSS syntax:
.example {font-size: x-large;}
HTML syntax:
X-large
CSS syntax:
.example {font-size: 15pt;}
HTML syntax:
Point size 15
font-variant
You can also choose between normal capitals and small capitals, for less
attractive text.
CSS syntax:
.example {font-variant: normal;}
HTML syntax:
normal text
CSS syntax:
.example {font-variant: small-caps;}
HTML syntax:
small caps
font-weight
This defines literally how much weight the letters must be. This means that we
define how bold we want to put the font type. It's possible to assign 2 kinds
of values, a number value or a predefined standard value. All possible values can you find back in the Property
List.
CSS syntax:
.example {font-weight: bold;}
HTML syntax:
Text in bold
CSS syntax:
.example {font-weight: 900;}
HTML syntax:
Font weight of 900
Text lay-out We can now adjust every font type in a defined text but we may not forget to
lay-out the text itself. Business like aligning, line height, ... are just as
important in the lay-out of a piece of text.
letter-spacing You can adjust the distance between several letters to attract attention
to it. This can be an alternative for putting the text in bold.
CSS syntax:
.example {letter-spacing: 4;}
HTML syntax:
spacing 4
text-decoration Text-decoration gives you the possibility to underline or line-through a
text. Also a line on top of the text is possible here.
CSS syntax:
.example {text-decoration: underline;}
HTML syntax:
underline the text
CSS syntax:
.example {text-decoration: overline;}
HTML syntax:
line on top of the text
CSS syntax:
.example {text-decoration: line-through;}
HTML syntax:
line-through the text
vertical-align Vertical-align gives you the possibility to put Subscript and Superscript
in a text. This is a floating text or a text at the foot of a word. Attention,
please! This can only be used by an in-line lay-out (lay-out that is valid
for 1 or more words or letters in a line, not for a total body.
CSS syntax:
.example {vertical-align: sub;}
HTML syntax:
Subscriptsub
CSS syntax:
.example {vertical-align: super;}
HTML syntax:
Superscriptsuper
text-transform It's also possible to edit a text with CSS so that it automatically puts a
full text or part of a text itself in capitals. Also the other way around, to
put a full text or part of a text in lowercase, is possible.
CSS syntax:
.example {text-transform: uppercase;}
HTML syntax:
normal letters to capitals
CSS syntax:
.example {text-transform: lowercase;}
HTML syntax:
CAPITALS TO LOWERCASE
text-align Of course aligning a text can be very useful. This is a many used
attribute that is easy to use. Here we know the 4 alignments as value: left,
right, center and justify.
CSS syntax:
.example {text-align: right;}
HTML syntax:
text aligned to the right
CSS syntax:
.example {text-align: center;}
HTML syntax:
text aligned to the center
text-indent Text-indent takes care that you get the opportunity to indent the first
line of a defined text. You can set the value yourself in pixels or in
percentage.
CSS syntax:
.example {text-indent: 30px;}
HTML syntax:
The first line of this text has an indent of 30 pixels. The rest of this text just continues on the next line without the indent. We can go on and on with this without the indent.
CSS syntax:
.example {text-indent: 40%;}
HTML syntax:
The first line of this text has an indent of 40%. The rest of this text just continues on the next line without the
indent. We can go on and on with this without the indent.
line-height It's also perfectly possible to define the height of lines. By doing this
you can get more or less space between your lines. The value is set in pixels.
CSS syntax:
.example {line-height: 50px;}
HTML syntax:
A text consisting of multiple lines contains more white space between the lines than a common text without a lay-out for the text.
Color and Background Now we've done the lay-out of the font type we can go on with the next step
the colors. in CSS not only the color of the font can be altered, but almost of
every object. So also for buttons, backgrounds, tables, .....
color This attribute gives you the possibility to alter the foreground of a
defined object. The value can be defined in 2 ways. The first possibility is
the Hexadecimal notation like in HTML or a predefined standard value like
yellow, green, ..... Don't forget to put a # in front of a
Hexadecimal value. Here you see an example of both.
CSS syntax:
.example {color: red;}
HTML syntax:
red text
CSS syntax:
.example {color: #000050;}
HTML syntax:
text in color value #000050
background-color
Background-color is used to set the background color. This can be the
background of a page, text, cell or anything else that can have a
background. There are three kinds of values for this attribute (Hexadecimal
notation, predefined standard color and transparent). The transparent value
is a special value. This value makes the background transparent and takes
care that the color of the object behind it becomes visible. This is mainly
used with buttons.
CSS syntax:
.example {background-color: lime;}
HTML syntax:
lime background
CSS syntax:
.example {background-color: #356578;}
HTML syntax:
background color: #356578
background-image
Of course it's also possible to use an image as background. Also with CSS
you can put a background image on a page or a defined object. To do this we
have to fix the location in the CSS code. This is done in the following way:
url(images/example.jpg)
background-repeat
When we put an image as a background, then it's also possible to repeat this
whenever the object you put it on is larger than the image itself. With this
it's possible to repeat the image horizontally, vertically, in both
directions or in none of the directions.
background-attachment
CSS gives you also the possibility to fix the image to the background so
that it will stay when you scroll. With this you also avoid that the image
is broken when scrolling.
Borders The borders of a text, cell, button, ... are handled extensively in CSS. You
can choose different styles, width, colors and many more.
border-width With this you define the width of your border around an object. You can
define the value in pixels or in a standard value (thin, medium or thick).
If you define a border-width, then you must also define a border-style.
a border with a width of 3 pixels and a dotted style
border-color
Attaching a color to a border is based on the attribute color. In principle
it's just the same, you can define a color as Hexadecimal value or a
standard color.
a border with a width of 3 pixels, dotted style and the color lime
You can also use all these properties 1 border of a framework or a
combination, like for the top: border-top-style or border-top-color. This is the
same for left, right and bottom.
Margin Now that you can put borders around an object you must also know that you
can also define the distance from the borders to the content. Not to only the
content, but also the margin facing the surrounding objects. For this there are
2 specific properties (padding and margin).
padding This attribute defines the space between the content of a defined border
or cell and the border of this. It's also possible to define a value to just
1 side of the border by assigning the side in the attribute.
margin
Margin defines in his turn for the space around the border or object. It's
also possible to define a value to just 1 side of the border by assigning
the side in the attribute.
Advanced Here you will learn to use positioning and other less known CSS properties.
Positioning CSS makes it possible to position all objects on a personal manner with
absolute and relative positioning.
position To fix the real position of an object we can define a position through
CSS. There are 2 kinds of positioning: absolute and relative. For an
absolute positioning you define the coordinates of the object from top-left
corner of your screen. For relative positioning you define the coordinates
of the object from the object beneath the object to define. Here you can
make a distance of for example 5 pixels.
The distance itself is defined with the properties: top, left, right or
bottom. The value of these properties are defined as the number of pixels.
Attention, please! You can also define negative values and in this
way bring the object half or in total outside the window.
The object is put on 40 pixels from the top and 30 pixels from the left side
of the object where the defined object is placed.
You can see an example of this here.
clip
If you want to put an image in an object that is smaller than the image
itself then you can define the position of the image yourself. You put the
image in such a way that the desired part of the image is shown. The
property can contain 2 values: auto or a value in the shape of (0 width
height 0).
Just a part of the image is shown, 50 pixels wide and 100 pixels high.
You can see an example of this here.
overflow
If you put more content in an object than that there could be in the object,
then it's also possible to resolve this. Eventually the object gets
scrollbars. The values for this property are: auto, visible, hidden and
scroll.
z-index
CSS gives you also the possibility to work in layers on a web page. These
are different layers that eventually can be placed on top of each other. The
placing on top of each other is only possible when you combine it with a
self defined position. The attribute z-index defines the order of the layers
(which layers is at the bottom and which layer is at the top). So the values
are in numbers.
CSS syntax:
.example {z-index: 1}
HTML syntax:
an object
CSS syntax:
.example {z-index: 2}
HTML syntax:
This object can be placed on top of the other object when the positions
overlap each other.
You can see an example of this here.
float
This attribute defines the text circulation of the image. With this you can
let the text continue on the left or right side of the image. Here you can
define a value of left or right.
clear
If you want that a defined text will be put at the bottom of the image then
you can do this by define the attribute clear that the attribute float has
to be denied. The values that can be defined are: left, right or both.
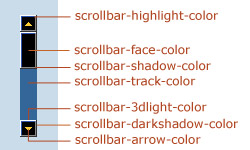
Special Here you see how you can adjust the scrollbar (As far as I know is this not
supported with every browser. I believe it's only supported in Internet
Explorer 5.5 and above. That's also the reason why I've put it in a special section of the
tutorial).
Scrollbar coloring I'll show the attributes that are available for the coloring of a scrollbar
in the image beneath.
The values of the attributes can be defined as a Hexadecimal value or a
standard color.
Beneath you see the CSS syntax to color the scrollbar.